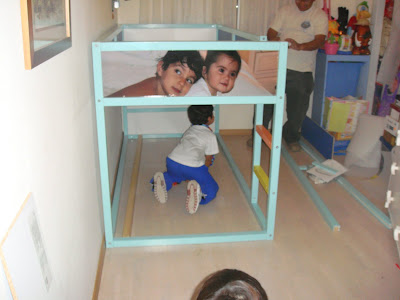
In my last post I talked about Henry's birthday gift; his bed! I wanted to show you some more pics of the bed. We're so happy with the results! We hacked the Ikea Kura bed just adding one more "mattress zone" and make it like a bunk bed, but it isn't as tall as regular bunk beds are, because we were afraid of the big beds!
We just painted all the wooden pieces of the bed with Agatha Ruiz de la Prada's paints that has amazingly fresh colors to use for kids or modern homes. The color we used was "agua" (water). Then we asked our friend Javi from Looping if he could put some photos in the bed blue panels, and he did that fantastic job! And then it was just hard work from Henry trying to assemble all the pieces and cut the parts where the 2 beds had to join.


 And this is the result!!!

 For the large front I used one of Rina Kroes sets to make the panels called "Oh night divine!"

 Oh, almost forgot that the steps were painted with a regular crafters paint in bright colors to add a bit of more color to the bed. Oh and also all the bed has a top coat of "outside" barnish just in case the kids go to the higher bed with shoes on or whatever... You know with kids the "just in case" is the most important part of the project! lol...

 ANd now all the Pokemons are enjoying their life in a higher place, and had occupied the blanket Henry's Grandma made for his birthday! lol
 And also Hulk, Iron Man, Lighting McQueen....

16 comments:
Os ha quedado preciosa!!! entiendo vuestros quebraderos de cabeza porque precisamente estoy yo buscando cama para la habitación de mi niña, y no me decido por literas porque... ¿quién puede hacer bien la cama de arriba? jejeje
Ooh! Those are awesome! I liked those Kids Beds.
Your daughter's little feet are so cute!
Uff hace tiempo que no hablamos... culpa mía, lo siento, he sido esclavizada, pero ya me liberé.
tienes un premio ;)
Qué gran idea! y qué currada!
Un saludo.
Increible!
ha quedado chulisma!
This is so nice! I love it. I have 2 kids and Im also afraid of big bunk beds. We are moving soon and we need something like this. How did you do the bottom part of the bed? Did you buy the wood and do it yourself or were u able to purchase it built?
Any help will be appreciated! Thanks =)
Hi Caridad! I understand what you mean about bunk beds! They're all so tall.
WHat we did for the kids room was to assemble together 2 Kura beds. The price is not as high as most of the bunk beds we saw before we decided to make it ourselves!
We assembled one complete Kura and then with the other ones we did cut the stairs pieces, etc... and left only the basement part of the bed, where the mattress goes.
I hope this make sense for you. My English is getting worse every time!!! lol...
Please, if you still have any question, don't hesitate asking me!
HUgs, thanks for your sweet comments and good luck for your new home!!!!
Hi, that is an excellent idea to make bunk bed from loft. How did you secure the lower part to the loft bed on the top? Thank you, Veronica
Hello,
that is a great idea to combine to loft beds to build a bunk. Really nice decorating. I have a question, how did you secure the lower part with the loft?
Thank you, Veronica
Hello Veronica,
Just with screws attached to both parts. Well, hope this makes sense in English, lol...
If you have any question pelase just tell me and I'll be so glad to help yoU!
Celia
hi, new to the site, thanks.
hola, me ha encantado ,como os quedo la cama. Yo tengo mellizos y quiero hacer lo mismo, pero queria saber como habeis unido las dos camas. Mi e-mail: brujibrush@hotmail.com
¿me podeis ayudar?
muchas gracias.
Sonia.
Hola Sonia,
Muchas gracias por tu comentario!
Lo que hicimos fue comprar dos camas de Kura y a una de ellas le cortamos la parte de las escaleras, etc... dejando sólo la base con los paneles (los que cambiamos por fotos d elos niños).
Osea, montamos una cama completa de la forma que venía en las instrucciones y la segunda cortamos las partes que sobraban de la base de paneles y sobre esa base atornillamos la cama completa.
Espero que me haya explicado bien. De todos modos si tienes alguna otra pregunta no dudes en contactar con nostros que intentaré ayudarte en todo lo que pueda! Los niños están encantados con su cama y eso que ya hace años que la montamos...
Hola Celia!!
¿Cómo fue el proceso de pintar la cama y las escaleras? Tuvisteis que tratar la madera antes? ¿Barnizasteis? Me gustaria saber un poquito mas sobre esto de pintar la kura ;)
Hola Marta,
Muchas gracias por tu comentario.
No fue muy complicado.
Lijamos un poco todas las piezas antes de montar la cama, luego las pntamos y la montamos y el último paso fue darle una capa de protector.
Las escaleras las pintamos con una pintura de exteriores que nos dijeron en la tienda, aguantaría mejor el paso de los niños todos los días, y tenían razón porque la cama la tendremos que quitar dentro de poco pero por cuestión de comodidad de los niños, no porque la cama se haya estropeado en lo más mínimo.
Sinceramente nunca pensé que esta cama de Ikea fuera a durar tanto tan bien.
Espero haberte ayudado y cualquier otra consulta no dudes en escribirme de nuevo.
Celia
Post a Comment